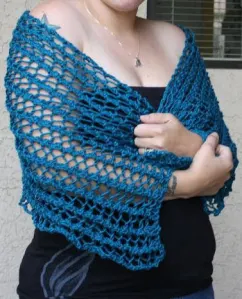
Ventura Wrap

Comfy! Cozy!

Just off the 101 highway in Southern California is the sleepy beach town of Ventura. When I think of the beach, I think of Ventura. Balmy summer nights spent walking along the pier after a dinner at In-N-Out. I think of long walks on sandy shores at dusk when the slight breeze and setting sun make a light cover necessary. I think of lazing blissfully in the sun, soaking in every glorious moment.
This wrap envelopes every sentiment I love about Ventura- her simple beauty, warmth, and versatility. The 3 stitches are carried throughout the entire wrap so that you can knit this wrap without even thinking about it. It can be knit in any weight yarn, or with any fiber, and can go from casual to formal in an instant! You can lace ribbon up the sides and wear it as a long sleeved shrug! While the sample was knit using Red Heart Soft Yarn, this wrap will make a beautiful canvas to display a beautiful handspun or dyed yarn. I recommend yarns or fiber offered by Extreme Spinning- her yarns are gorgeous, the colors are saturated and organically dyed, and all fibers are from sustainable farms! You can find her shop at Extremespinning.etsy.com She has phenomenal yarn!!!
Materials:
250 Yards of Worsted weight yarn
Size US 17 Needles
Tapestry Needle
6’ of ribbon (if you plan to use as a shrug)
To determine length, measure your arm span from one wrist to the other, going across your back. If you don’t plan on wearing as a shrug, knit as long as you like!
Pattern:
Cast on 36 stitches
Row 1 and every following row: (K1, YO, K2tog) across
Once the wrap is knit to your desired length, bind off loosely.
Use the tapestry needle to weave in your ends.
To wear as a shrug, measure the length from your wrist to armpit.
Fold the shrug in half width-wise so that the long sides meet.
Take your arm measurement and, starting at the edge, measure towards the center of the shrug until you hit your measurement. Once you find it, pull a length of ribbon through eyelet on one side of the shrug to the other side. Like lacing up your shoes!
Continue until you reach the edge and tie in a bow.
Continue for other sleeve.

Fresh Bite Scarflet

Fresh bite!

A Twilight-inspired scarflet knit in white with blood red buttons. The cables and seed stitch, paired with the vampire bite eyelets, give this scarflet a uniquely sophisticated look that will leave even the most die hard Jacob fan wanting their own set of Vampire bites!

Materials:
Patons Classic Merino Wool (I used Winter White)
US 8 Straight Needles
Cable Needle
Tapestry Needle
Sewing needle with thread to match your yarn
4 buttons
Blocking pins

Pattern:
Cast on 30 stitches
Knit 4 rows of Seed Stitch (K1, P1) across.
Begin Pattern:
Row 1: K1, P1, K7, P3, K6, P3, K7, P1, K1
Row 2, 4, 6, 8: K1, P1, K1, P to last 3 sts, K1, P1, K1
Row 3: K1, P1, K7, P3, K1, YO, K2tog, K3, P3, K7, P1, K1
Row 5: K1, P1, K1, C6F, P3, K4, YO, K2tog, P3, C6F, K1, P1, K1
Row 7: K1, P1, K7, P3, K6, P3, K7, P1, K1
Repeat the 8 rows to desired length minus 1/2″ (1.3 cm) Sample shows pattern repeated 16 times for a total of 17 cable twists. END WITH ROW 8.

Next row: Beginning with a knit stitch, work in seed st across row.
Next row: Beginning with a purl stitch, work in seed st across row.
Next row: K1, YO, K2tog, (K1, P1) 3 times, K1, YO, K2tog, (K1, P1) 3 times, K1, YO, K2tog, (K1, P1) 3 times, K1, YO, K2tog
Next row: Beginning with a purl stitch, work in seed st across row.
Bind off.

Block the scarflet. Sew on the buttons along the edge of the scarflet in line with the button holes, using the photos as a guide.

Not sparkly, but still fabulous!

Gretta’s Bag

Gretta's Bag

Materials:
110 yards of Super bulky wool yarn (I used Cascade 109.)
US 15 needles
Tapestry needle
Fabric for lining
Thread to coordinate with the color of your yarn
Gauge: 5 sts and 7 rows= 2” (before felting)
Pattern:
CO 30 sts
Row 1: Knit
Row 2: Purl
Row 3: Knit
Row 4: Purl
Row 5: K5, CF12, K 13
Row 6: Purl
Row 7: Knit
Row 8: Purl
Row 9: Knit
Row 10: Purl
Repeat rows 1-10 5 times, for a total of 6 cable twists.
Bind off.
Fold the piece in half with the CO and BO edges together. Seam the sides closed, leaving the top open.

STRAP: (Shown with 1, but would be great with 2)
CO 10 sts
Work in Stockinette until piece measures 12”. BO.
FINISHING:
Felt the purse to desired felty-ness and block. Using coordinating thread, sew the strap to the purse body. Line the bag and strap if you so choose.

Lining example

Bartholomew

Bartholomew

Materials:
Size 5 dpns
Worsted Weight yarn (I used Caron Simply Soft in Mango)
Tapestry needle
Felt for eyes and teeth
Sewing needle and thread to sew eye and fangs to the face

DIRECTIONS:

BODY:

CO6 and divide
Row 1: (K1, M1, K1) around
Rows 2, 4,6,9, 10: Knit around
Row 3: (K1, M1, K1, M1, K1) around
Row 5: (K1, M1, K1, M1, K1, M1, K1, M1, K1) around
Row 7: (K2, M1, K5, M1, K2) around
Row 9: (K2, M1, K7, M1, K2) around
Row 11: (K2, M1, K9, M1, K2) around
Rows 12-25: Knit
Row 26: (K2tog, K11, ssk) around
Row 27: Knit around
Row 28: (K2tog, K9, ssk)
Row 29: Knit around
Row 30: (K2tog, K7, ssk)
Row 31-60: Knit around
At this point you should stuff the body
Row 61: (K2tog, K1) around
Row 62: (K2tog, K1) around
Row 63: (K2tog) around
Cut yarn and draw through remaining stitches.

LEGS

CO 16 and divide between 3 dpns
Rows 1-15: Knit around
Row 16: (KFB, K1) around
Row 17: Knit around
Row 18: (KFB, K2) around
Row 19-21: Knit around
Row 22: (K2tog, K2) around
Row 23: Knit around
Row 24: (K2tog, K1) around
Row 25: K2tog around
Break yarn and draw through remaining stitches.

ARMS:

CO 10 and divide between 3 dpns
Rows 1-10: Knit around
Row 11: (KFB, K1) around
Row 12: Knit around
Row 13: (KFB, K2) around
Rows 14-16: Knit around
Row 17: (K2tog, K2) around
Row 18: Knit around
Row 19: (K2tog, K1) around
Row 20: K2tog around
Break yarn and draw through remaining stitches.

Stuff the arms and legs to desired firmness, and using the pictures as a guide, sew the arms and legs to the body. Use the felt pieces to make desired number of eyes, and fangs and sew the pieces to the face.

Holiday Doll

Holiday Doll

This doll is a SUPER QUICK knit, making it a perfect last minute Holiday gift!!! Enjoy!

Materials:
Size 5 dpns
Patons Brilliant- Radiant Red
Classic Elite Premier- White
Rowan Handknit Cotton- Lightish Blue and small amount of Black
Cardboard circle cut to 2.5″ diameter (for base stability)
Yarn needle
Polyfil stuffing stuff

Pattern:
CO 6 and divide between 3 dpns
Rows 1, 3, 5, 7, 9, 11- Knit all sts
Row 2- Kfb around (12 sts)
Row 4- (kfb, k1) around (18 sts)
Row 6- (kfb, k1) around (27 sts)
Row 8- (kfb, k2) around (36 sts)
Row 10- (kfb, k1) around (54 sts)
Row 12- (kfb, k16) around (60 sts)
Row 13-27- K
AT THIS POINT, PLACE THE CARDBOARD CIRCLE IN THE BASE
Row 28- (k2tog, k16, k2tog) around (54 sts)
Row 29- (k2tog, k14, k2tog) around (48 sts)
Row 30- (k2tog, k12, k2tog) around (42 sts)
Row 31- (k2tog, k10, k2tog) around (36 sts)
Row 32- (k2tog, k8, k2tog) around (30 sts)
Row 33-40- K
STUFF THE BODY AND SWITCH TO THE SKIN COLOR
Row 41-43- K
Row 44- (k2tog, k6, k2tog) around (24 sts)
Row 45- K2 tog around (12 sts)
Row 46-48- K
Row 49- Kfb around (24 sts)
Row 50- K
Row 51- (kfb, k1) around (36 sts)
Row 52-56- K
Row 57- K2tog around (18 sts)
STUFF NECK AND HEAD
Row 58-K2tog around (9 sts)
Break yarn and draw through remaining stitches. Fasten securely.

HAIR-
You can pretty much do the hair however you prefer. This was the first time I’d done doll hair like this, and I dont really recommend it. I wrapped the yarn around a small book several times, and broke the yarn. I cut the ends on each side (the “loops”) and sewed right down the middle to attach it to the dolls head.

FACIAL FEATURES-
Again, this is something you can do however you prefer.

ARMS-
CO 6 sts. Using I-cord method, work until piece measures 3 inches, or to your desired length. Cut yarn and draw through remaining sts, fastening securely. Attach them to the dolls body just above the dress/skin line.

Luxe Leftovers Coffee Cozy

Luxe Leftovers

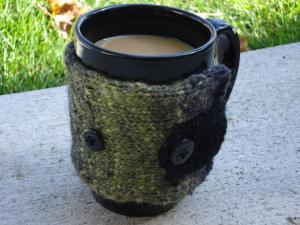
The inspiration for this coffee cozy came from the leftover Noro I had from making the Calorimetry. It was too beautiful to just let it sit in the bottom of my project bag or stash, and it was just getting to the good part- the GREEN part!!! I love how this yarn is varigated- its the first varigated yarn I’ve used and have been very pleased with the results. Because it is adjustable, you can use it with your favorite coffee cup at home, OR with the disposable cups at your favorite coffee house! If you knit this, please send me a picture or upload them to your Ravelry notebook!


THIS PATTERN IS MEANT FOR YOUR PERSONAL USE AND NOT TO BE SOLD OR TO BE REPRESENTED AS YOUR OWN WORK!
Materials:
Any Aran or Worsted weight yarn (I used the luxurious Noro Cash Island)
Size 6 straight needles
3 Buttons
Sewing needle
Thread
Rust Proof blocking pins (optional)
Directions:
CO 20
K in Stockinette st until the piece measures 8″
Next Row: BO 5, K to end
(10 stitches remain)
Starting with a K row, K 2 rows stockinette stitch
*Next Row: K 3, BO 4, K 3
Next Row: P 3, CO 4 using Cable Cast on method, P 3K 10 rows stockinette st*
Repeat from * to * twice, but on the second repeat, instead of knitting 10 rows st st, only k 2 rows st st.
BO.

Button Placement

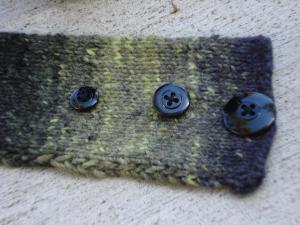
If you used an animal fiber, you can block your cozy to make it prettier if desired. Once you’re ready to attach your buttons, simply lay the buttonholes across the part of the fabric where the buttons will be to figure out the proper placement for the buttons.

Eve’s Pasties

Eve's Pasties

Materials:

Size 11 straight needles
Patons Classic Merino Wool in Leaf Green (or similar feltable yarn) HELD DOUBLE STRANDED!
Fabric for lining (optional)
Thread for sewing lining to back (optional)
Buttons (optional)
Rust proof blocking pins

Directions:
With 2 strands of the wool:
CO 2
Row 1: K across
Row 2: P across
Row 3: kfb, kfb
Row 4: P across
Row 5: kfb, k2, kfb
Row 6: P across
Row 7: kfb, k4, kfb
Row 8: P across
Row 9: kfb, k6, kfb
Row 10: P across
Row 11: kfb, k8, kfb
Row 12: P across
Row 13: K across
Row 14: P across
Row 15: ssk, k8, k2tog
Row 16: P across
Row 17: ssk, k6, k2tog
Row 18: P across
Row 19: ssk, ssk, k2tog, k2tog
Row 20: P across
Row 21: ssk, k2tog
Row 22: P across
Row 23: K across
Row 24: P across
Row 25: K across
Row 26: P across
BO remaining stitches.

So now at this point, if you choose to felt your leaves go ahead and do so.
Use your rust proof blocking pins when your leaves are felted to your desired level of felty goodness. You may have to pull and stretch your leaves a bit to get your desired shape, but its all in the name of some sexy boobie coverings, I promise!

Elvis the Owl

Elvis!

Materials:

Brown yarn (acrylic or wool, either is fine- mine is acrylic)
Orange yarn for the feet
Small amounts of whatever color yarn you want to use for the scarf
Small amounts of white, black, and orange felt
Thread to attach the felt pieces
Yarn needle
Tapestry needle
Craft scissors
Size 5 DPN’s
Size 5 straight needles

Directions:

Head & Body:
With size 5 dpns, CO 6 sts. PM.
Row 1: KFB around (12 sts)
Row 2: K around
Row 3: KFB around (24 sts)
Row 4: K around
Row 5: *KFB, K1* repeat around (36 sts)
Row 6: K around
Row 7-20: K all sts
Row 21: (K1, ssk twice, K2, K2tog twice, K1) around (24 sts)
Row 22: (K1, ssk, K2, K2tog, K1) around (18 sts)
Row 23:(K1, ssk, K2tog, K1) around (12 sts)
At this point, stuff the head nice and firmly.
Row 24: (ssk, K2tog) around (6 sts)
Row 25: K around
Row 26: KFB around (12 sts)
Row 27: KFB around (24 sts)
Row 28: KFB around (48 sts)
Row 29: K around
Row 30-49: K around
Row 50: K2tog around (24 sts)
Row 51: K around
Row 52: K2tog around (12 sts)
Row 53: K around
Row 54: K2tog around (6 sts)
Break yarn and pull through remaining stitches. Fasten tightly and secure.

Wings:
Wing 1:
CO 10 sts
*Row 1: K all sts
Row 2: P2tog, P to end*
Repeat rows 1 and 2 to 5 sts. BO.

Wing 2: CO 10 sts
*Row 1: P all sts
Row 2: K2tog, K to end*
Repeat rows 1 and 2 to 5 sts. BO.

Feet: (Make 2)
CO 1
Row 1: KFB
Row 2: P
Row 3: KFB twice
Row 4: P
*Row 5: KFB, K to last st, KFB
Row 6: P*
Repeat rows 5 & 6 to 8 sts
Next Row: (starting 1st talon)K3, turn
Next Row: P2tog, P1
Next Row: K2tog, turn
Next Row: P2tog
Next Row: BO1, Cut yarn and draw through.
Next Row: (starting 2nd talon)K2, turn
Next Row: P2 turn
Next Row: K2, turn
Next Row: P2, turn
Next Row: Draw yarn through remaining sts.
Next Row: (starting 3rd talon) K3, turn
Next Row: P1, P2tog
Next Row: K2, turn
Next Row: P2tog
Next row: BO1, cut yarn, draw through remaining sts.

Ears: (Make 2)
CO 4 sts
Row 1: K around
Row 2: P around
Row 3: K2tog twice
Row 4: P across
Row 5: K2tog
Cut yarn and draw through last st.
Scarf:
CO 6
Knit to desired length
BO

For eyes and beak, use small amounts of felt and attach to the facial area using coordinating thread colors.

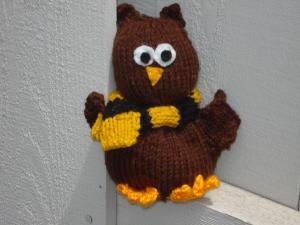
Attach the feet, ears, and wings to the body of the owl, slip on the scarf, and send me a picture of your new little owlette!

Dirty Martini Olive Pasties

Dirty Martini Olive pasties

Materials:

Patons Classic Wool (Green)
Patons Brilliant (Radiant Red)
Scraps (at least 3 yards) of light brown yarn
Size 3 DPNs
Tapestry Needle
Crochet Hook (optional, to pull the toothpick through olive)

Directions:

With size 3 dpns, CO 48 sts.
Divide stitches by placing 16 sts on each of 3 needles.
K first round and place marker to indicate the end of a round.
Round 1: Knit around
Round 2: (K2, ssk, K8, k2tog, K2) around
Round 3:Knit around
Round 4: (K2, ssk, k6, k2tog, k2) around
Round 5: Knit around
Round 6: (K2, ssk, k4, k2tog, k2) around
Round 7:Knit around
Round 8: (K2, ssk, k2, k2tog, k2) around
Round 9: Knit around
Round 10: (K2, ssk, k2tog, k2) around
Round 11: Switch to red, knit around
Round 12: (K1, ssk, K2tog, k1) around
Round 13: K2tog aroundBreak yarn and pull through remaining sts. Secure tightly.

To knit the toothpick:
Using 2 size 3 dpns, CO 2 sts. Work in 1-cord until toothpick is desired length. (I knit mine to about 4” and this seemed to work really well) Use the crochet hook to pull the toothpick ends from the back of the olive through to the front, as shown.

Lining:
Cut a circle of the fabric about ½” wider than the diameter of your olive. Cut a triangle out of the fabric (using this tutorial) and fold the extra ½” so that it sits under the lining. Using the sewing needle and thread, sew the fabric onto the back of the olive body

Succulent Cherry Pasties

Succulent Cherry Pasties

Materials:
Size 3 DPNS
Patons Brilliant Yarn (Radiant Red) or similar yarn
Scraps of green yarn (I used scraps of Patons Classic Wool)
Tapestry Needle
Sewing Needle
Fabric for lining the pastie
Thread for lining the pastie

Directions:
CO 42 sts and divide among the size 3 dpns. Knit the first row and place a marker after the last stitch to indicate the end of a round.
Rnd 2: (K1, ssk, K8, K2tog, K1) around.
Rnd 3: K
Rnd 4: (K1, ssk, K6, K2tog, K1) around.
Rnd 5: K
Rnd 6: (K1, ssk, K4, K2tog, K1) around.
Rnd 7: K
Rnd 8: (K1, ssk, K2, K2tog, K1) around.
Rnd 9: K
Rnd 10: (K1, ssk, K2tog, k1) around.
Rnd 11: K
Rnd 12: (ssk, k2tog) around.
Cut the yarn and draw through the remaining stitches and secure tightly.
Stem:
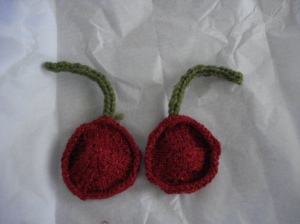
Using 2 size 3 dpns, CO 3 stitches and work in I-cord until the stem is your desired length. Mine ended up being about 3”. Cut the yarn and draw through the stitches and secure end. You can use scraps of the yarn used to make the cherries to sew the stem to the cherry body.
Lining:
Cut a circle of the fabric about ½” wider than the diameter of your cherry. Cut a triangle out of the fabric (using this tutorial) and fold the extra ½” so that it sits under the lining. Using the sewing needle and thread, sew the fabric onto the back of the cherry body.